The first question most people ask when they want to start their own diffuser brand is: “Can I get a custom shape made?”
It’s the wrong first question — not because custom molds aren’t real, but because they’re almost never the right starting point. Before you spend $50,000 on tooling and wait 18 months for a product, you need to know if anyone wants to buy what you’re selling.
Here’s the practical roadmap for getting a branded diffuser to market fast, without betting everything on a mold that hasn’t been tested.
The Custom Mold Reality Check
A private mold project means committing $50,000–$100,000+ upfront, a 2,000–5,000 unit MOQ, and a 12–24 month timeline before you have a product to sell. That’s not a startup path — that’s a scaling decision for a brand that has already validated its market.
If you’re at the beginning, that kind of investment before your first sale is how brands run out of runway.
The good news: you don’t need a custom shape to start your own diffuser brand with real branding, real packaging, and a product that feels like yours.
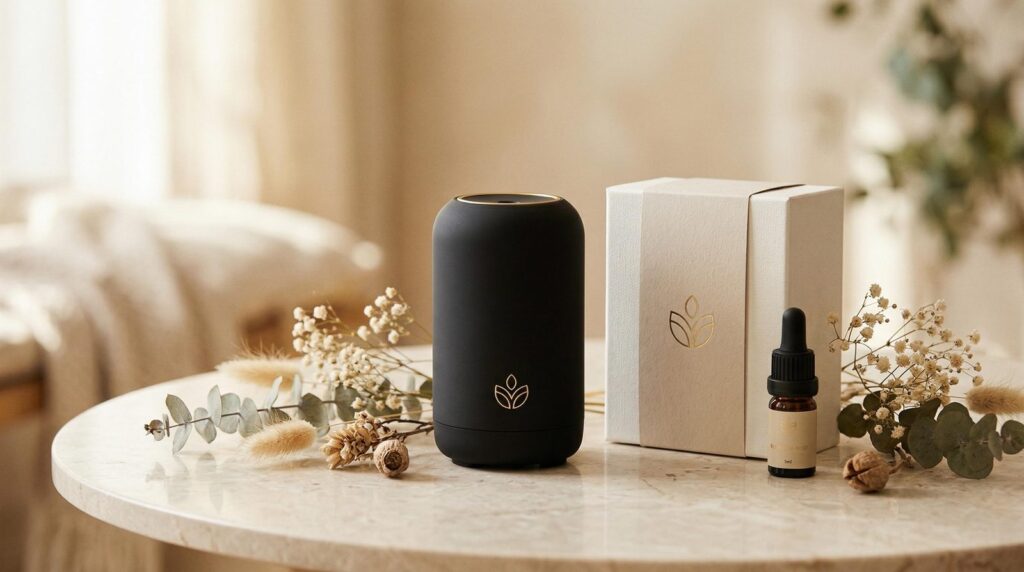
What 50 Units Can Get You
Fifty units is a real starting point. With existing models — hardware the factory already produces and has refined over thousands of production runs — you can have a branded, packaged product ready to sell in 60–90 days.
What you’re customising at this stage isn’t the shape. It’s the identity: your logo, your packaging, your fragrance. That’s the combination that builds brand recognition, and none of it requires tooling.
At 50–300 units, the realistic options look like this:
- Your logo on the machine (laser or UV sticker, more on this below)
- Branded packaging sleeve over a standard box
- Custom fragrance oil formulated to your brief
- Your product page, your story, your positioning
That’s a brand. And it’s testable.
Logo on the Machine: Two Options
Laser Engraving
Laser engraving etches your logo directly into the surface of the unit — permanent, clean, and premium. There’s no sticker to peel, no edge to lift in humidity, and no print to fade. On a matte aluminum or ABS unit, a laser-engraved logo reads as considered and high-quality.
This is the right choice if you’re positioning in a premium segment or your customer is the type to notice the difference.
Practical note: Not every model supports laser engraving. The surface material, finish, and logo complexity all affect whether it’s feasible. Your supplier should advise before you commit.
UV Sticker
A UV-printed sticker applied to the unit is flexible, lower cost, and easier to update. For a first run where you’re not 100% sure your logo is final — or where you want to test two different brand presentations — a UV sticker lets you iterate without tooling changes.
The trade-off is durability. UV stickers are not as permanent as engraving, and in certain environments (humidity, frequent handling) they’ll show wear faster. For a test batch of 50 units going to a specific retailer or gifting campaign, that’s often completely acceptable.
Practical note: UV sticker is frequently the smarter call at the testing stage. You can always move to engraving once the brand is locked.
Packaging: The Realistic Path by Volume
Packaging is where most first-time brand builders hit an unexpected wall. Full custom printed boxes typically require 500–1,000 units minimum — sometimes more. Here’s how to handle it at each stage.
50–200 units: factory standard box + custom sleeve The factory’s standard box is neutral and functional. A custom-designed paper sleeve (also called a belly band) wraps around it with your branding — logo, brand colours, tagline, QR code. No high MOQ, no tooling, and the result looks intentional rather than generic. This is the most practical solution for a first run.
200+ units: screen-printed logo on box Once you’re ordering 200+ units of the same model, screen printing your logo directly onto the standard box becomes viable for most models. It’s cleaner than a sleeve and starts to feel like a real product. Whether this is available depends on the model — your supplier should confirm.
500–1,000+ units: full custom printed packaging At this volume, you can commission fully custom packaging — your box design, your structural format, your unboxing experience. This is the level where packaging becomes a genuine brand asset. It’s also the level where you should know your product sells before you invest.
When Does ODM Actually Make Sense?
The honest answer: when you can say yes to all three of these:
- You have proof the product sells. Repeat buyers, retail orders, consistent demand — not just interest.
- You have stable volume. Custom tooling only makes financial sense if you’ll produce enough units to amortise the mold cost over time.
- You have the runway. 12–24 months from brief to product, plus the upfront tooling cost, before a single unit generates revenue.
If you’re not there yet, an ODM project will slow you down and drain capital you need for marketing, inventory, and operations.
The Rhythm That Actually Works
The brands we’ve watched build successfully follow a consistent pattern:
First: Get to market fast with existing hardware, real branding, and a real offer. Then: Learn what your customers actually respond to — the scent, the format, the packaging, the price point. After that: Invest in proprietary design from a position of knowledge, not hope.
When you start your own diffuser brand this way, the custom mold — if you ever do it — is a calculated scale decision, not a leap of faith.
We work with brands at every stage of this journey — from 50-unit first runs to full ODM development for established lines. If you want a straight read on what makes sense for where you are right now, we’re easy to reach.
Talk to Gemini at Scentvita → We grow with you.
Related reading:
- ODM Aroma Diffuser: What Custom Molds Really Cost
- How to Private Label Aroma Products: 5 Steps to Your Own Brand
- How to Source Aroma Diffusers from China: A Practical B2B Guide
External reference: How to Build a Brand in 7 Steps — Shopify